
You put your site behind Cloudflare, turned on the orange cloud, and now you're protected from DDoS attacks, bots and exploits. Right?
Only if nobody knows your server's real IP address. Cloudflare protects the traffic that goes through Cloudflare. An attacker who finds your origin IP can send requests straight to your server and skip the firewall, the rate limits, the bot checks and the cache, all at once.
Researchers who tried this at scale were able to reach most "protected" sites directly. This guide shows how origin IPs leak, how to check yours, and how to make your server refuse any traffic that didn't come through Cloudflare.
Why the origin IP matters
When a domain is proxied through Cloudflare, its DNS points to Cloudflare's IP addresses, not yours. Visitors connect to Cloudflare, and Cloudflare connects to your server.
If someone knows your server's IP, they can connect to it directly and send the domain name in the Host header:
curl -H "Host: example.com" http://203.0.113.10/
To your web server, this looks like a normal request for example.com. Everything Cloudflare does for you is skipped:
| Cloudflare protection | Direct to origin |
|---|---|
| DDoS mitigation | Skipped, the flood hits your server |
| WAF and managed rules | Skipped |
| Bot Fight Mode, challenges, Turnstile | Skipped |
| Rate limiting rules | Skipped |
| Cache | Skipped, every request hits PHP and the database |
| IP and country blocks | Skipped |
That last row is why one leaked IP can take down a site that "has Cloudflare": an attacker sends uncached requests to the heaviest page, and every one of them runs PHP and database queries on your server.
The 7 ways an origin IP leaks
| Leak | How attackers use it | Fix |
|---|---|---|
| DNS history | Services like SecurityTrails keep old A records. If the domain pointed at your server before you enabled Cloudflare, the IP is still on record. | Change the server IP after moving to Cloudflare |
| Unproxied subdomains | mail., webmail., ftp., cpanel. or direct. records with a grey cloud point straight at the server. | Proxy them, or point them at a different IP |
| MX records and email headers | If mail is sent from the same server, its IP is in the MX record and in the Received: headers of every email. | Send mail from a separate server or a mail relay |
| SSL certificates | Internet-wide scanners (Censys, Shodan) record which certificate every IP serves. A cert for example.com on 203.0.113.10 gives the origin away. | Serve only proxied hostnames, don't present customer certificates to scanners |
| Host header scanning | An attacker tries Host: example.com against whole IP ranges and looks for your site's content. | Refuse requests that don't come from Cloudflare |
| Outgoing requests | WordPress pingbacks (xmlrpc.php), webhooks, image imports and API calls connect from your server to a URL the attacker controls. | Block xmlrpc.php, be careful with "fetch this URL" features |
| Error pages and headers | Debug pages, phpinfo() or headers like X-Origin-IP print the address. | Turn off debug output in production |
The first four are about finding the IP. Host header scanning is how attackers confirm that a found IP really hosts your site, and it's the one you can shut down completely with a Cloudflare-only setup.
Step 1: Check whether your IP is exposed
Start with what's public in DNS right now. Every record that resolves to your server's IP, instead of to Cloudflare, is a leak:
# records that should be proxied (Cloudflare IPs) vs. your server IP
for name in example.com www.example.com mail.example.com webmail.example.com ftp.example.com; do
  echo "$name -> $(dig +short A "$name" | tr '\n' ' ')"
done

# where mail goes
dig +short MX example.com
Then check history and certificates:
- DNS history: look your domain up on SecurityTrails or ViewDNS.info (IP history). If an old record shows your current IP, assume it's known.
- Certificates: search your domain on crt.sh and Censys, and check whether any result shows your server's IP.
Finally, test from a machine that is not your server whether the origin answers for your domain:
curl -s -o /dev/null -w "%{http_code}\n" -H "Host: example.com" http://YOUR_SERVER_IP/
If this returns 200 and your site, anyone who has your IP can skip Cloudflare.
Step 2: Proxy every record that points to the server
In the Cloudflare dashboard, open DNS > Records and turn on the orange cloud for every A and AAAA record that points to your server: the apex, www, and any other subdomain that serves a website.
Some records can't be proxied. Cloudflare only proxies HTTP and HTTPS, so mail (SMTP, IMAP) and FTP have to be DNS-only. If they point to the same IP as your websites, that IP is public. The clean solutions are:
- send and receive mail through a separate server or a mail service, so the MX record points elsewhere,
- or give the web server a second IP address that is only used behind Cloudflare.
Step 3: Allow only Cloudflare to reach the site
This is the step that makes a leaked IP useless: the server answers requests for your domain only when they come from Cloudflare's IP ranges. Everything else is refused before it reaches your application.
In OpenPanel
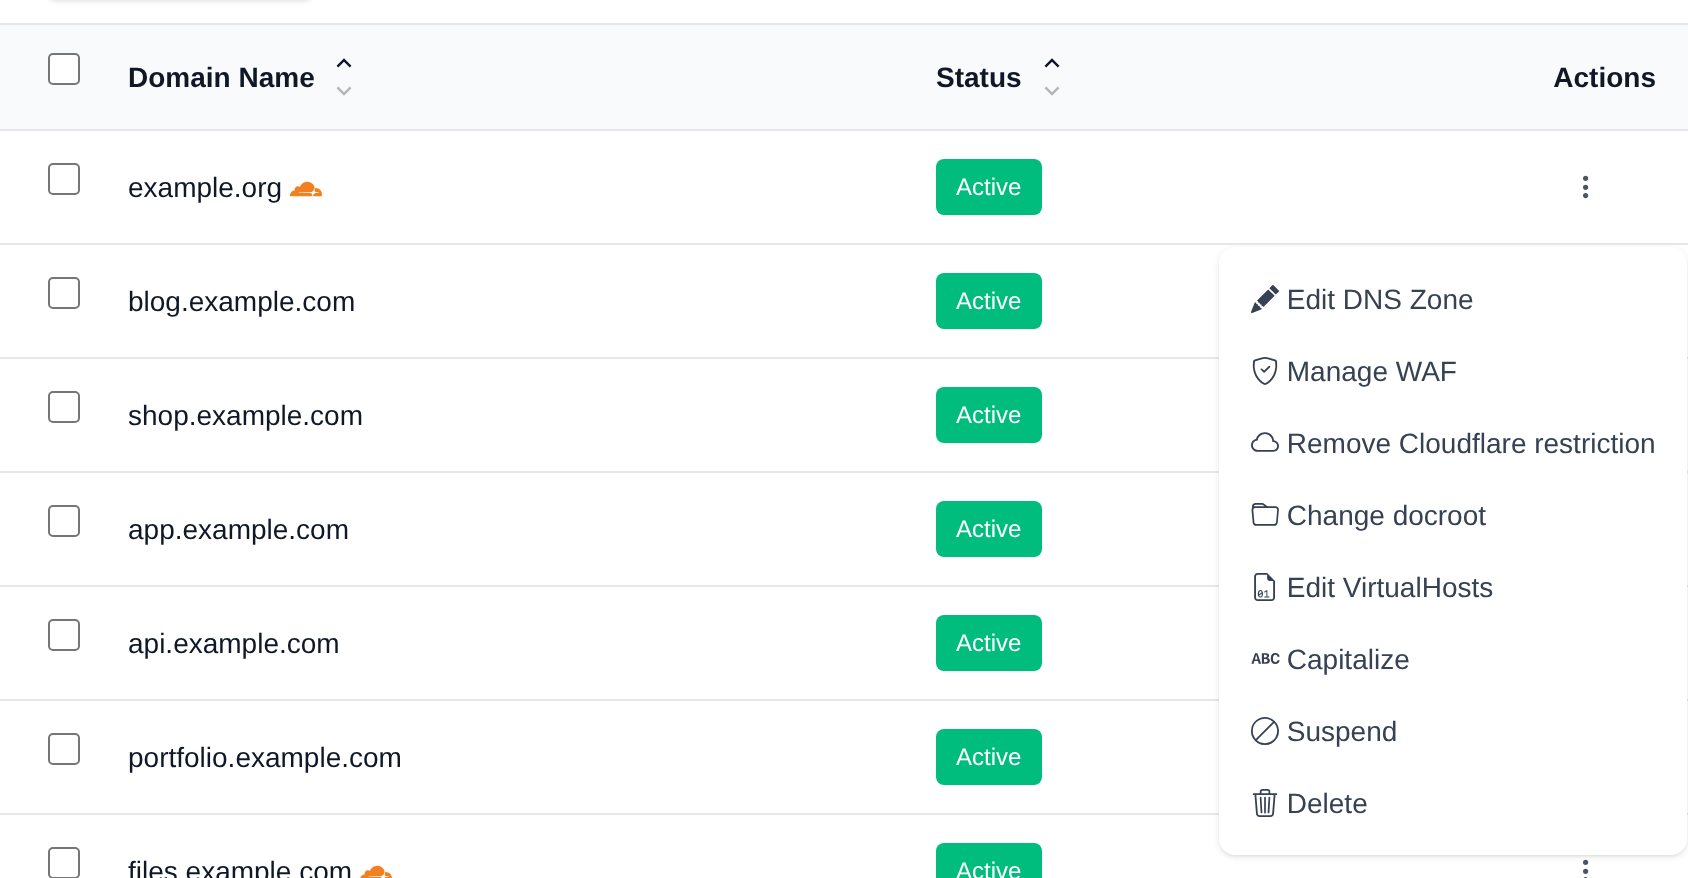
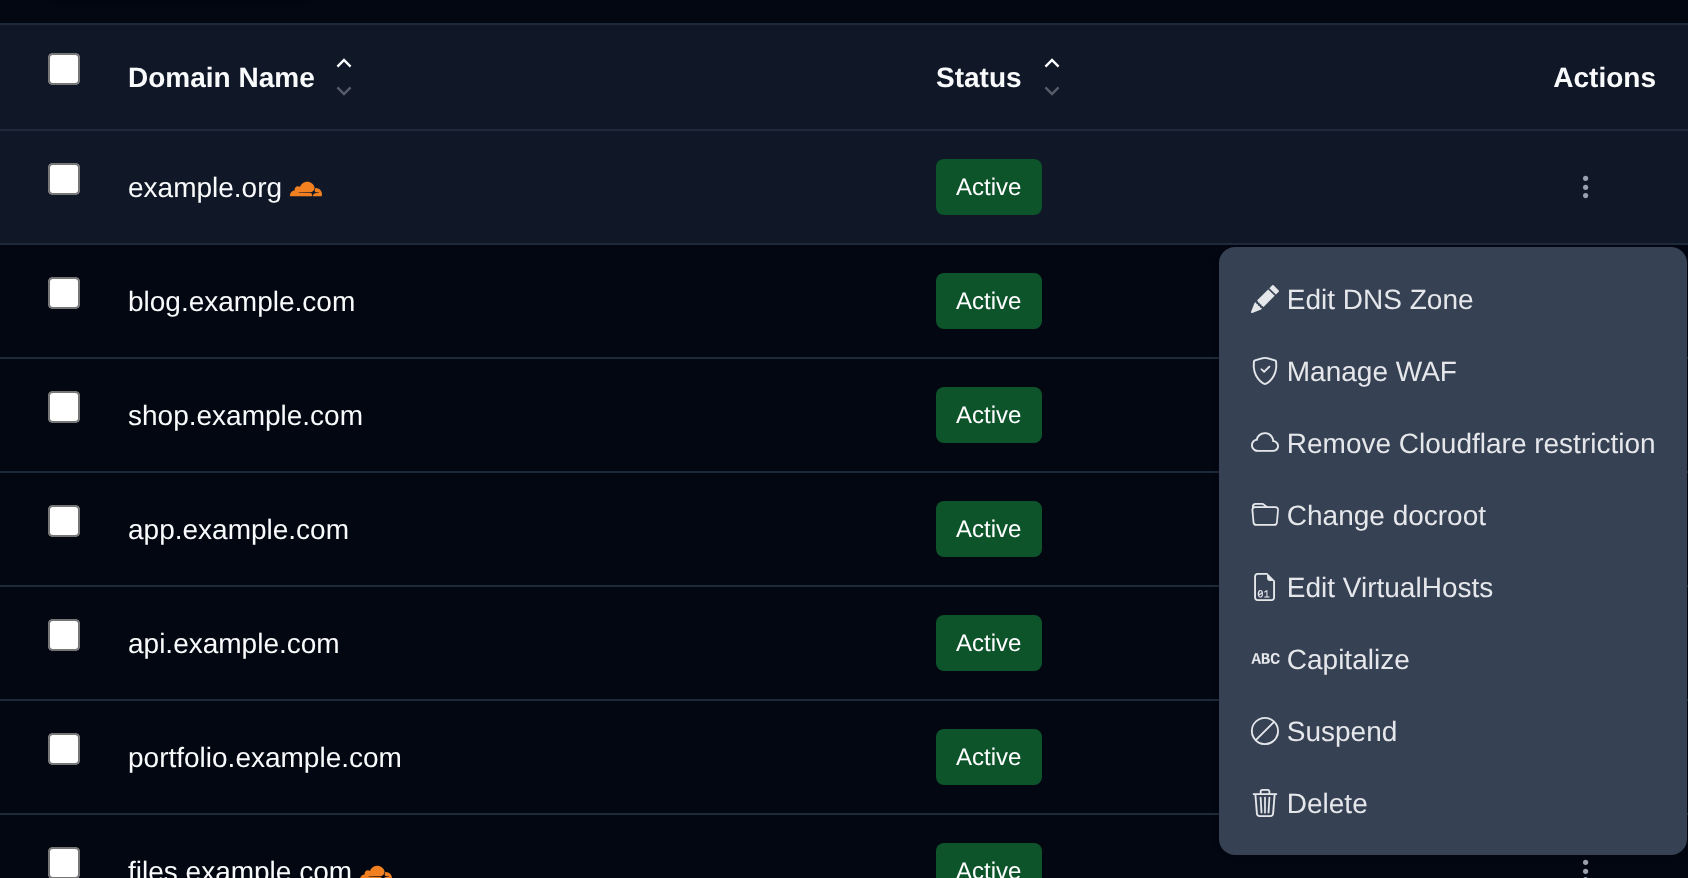
OpenPanel has a Cloudflare-only switch per domain. In OpenPanel, go to Domains, open the domain's Actions menu and click Restrict to Cloudflare. An orange cloud appears next to the domain name:
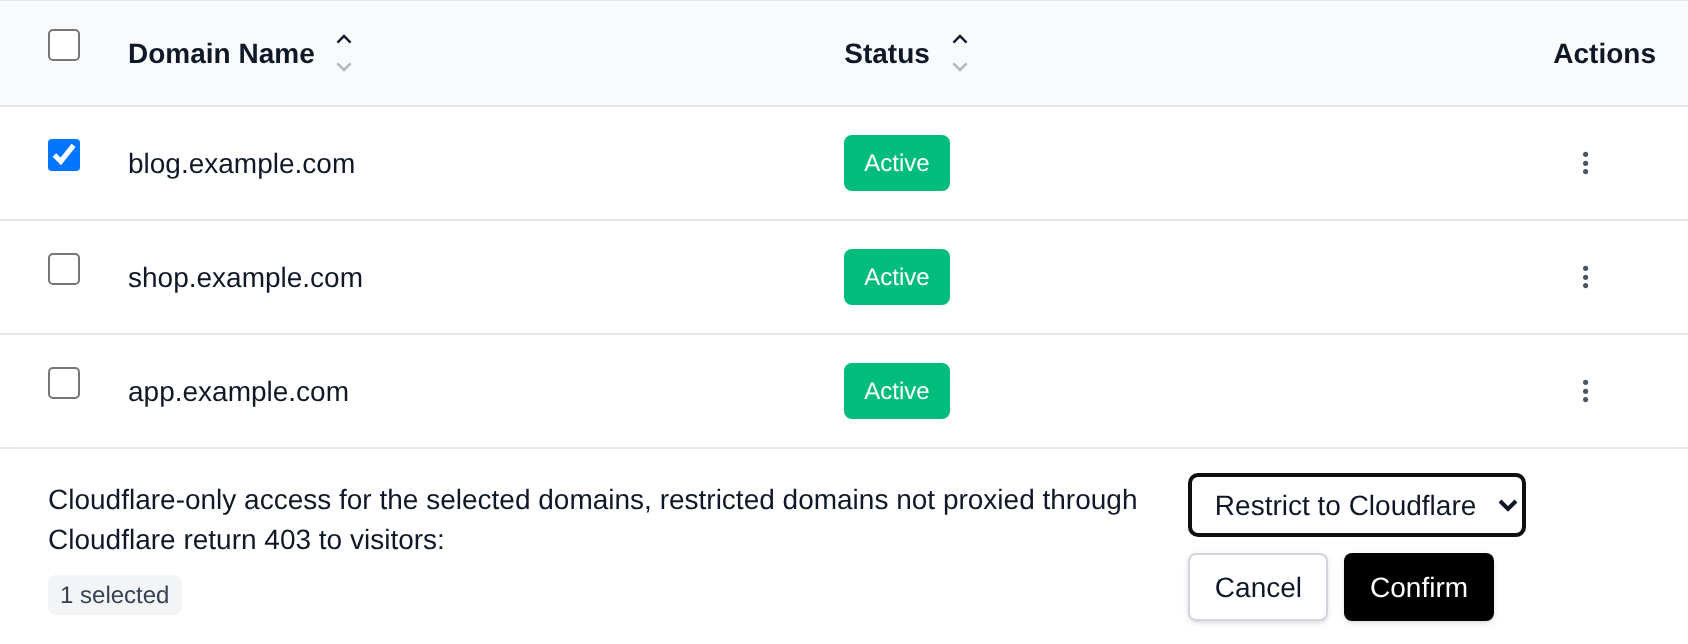
To restrict several domains at once, select them and use the Cloudflare bulk action:
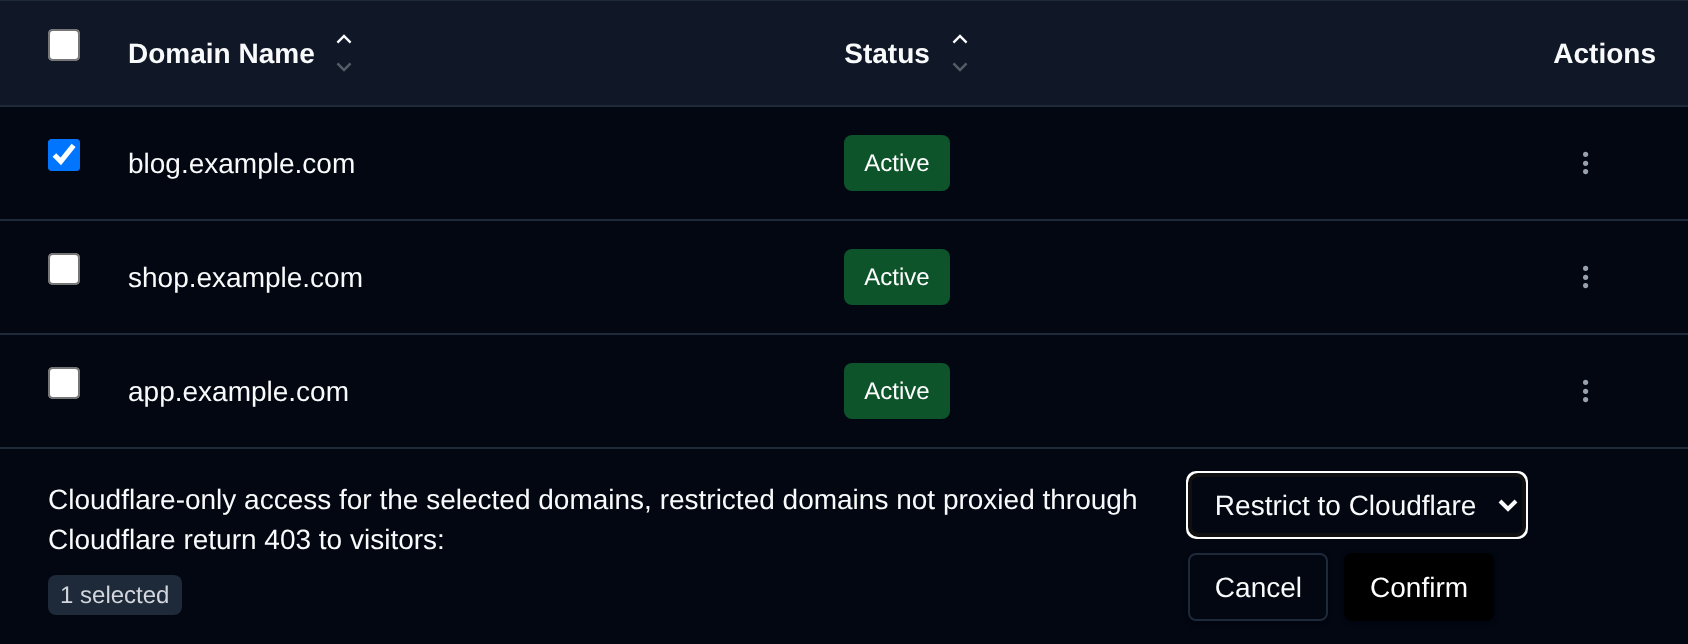
From then on, a direct request gets a 403 and never reaches PHP, the database or the WAF. We tested it on a server with two domains, one restricted:
$ curl -s -o /dev/null -w "%{http_code}\n" -H "Host: normal-site.com" http://203.0.113.10/
200
$ curl -s -w "\n%{http_code}\n" -H "Host: restricted-site.com" http://203.0.113.10/
Access allowed only through Cloudflare
403
A few details that make it safe to turn on:
- It's per domain. On a shared server some sites use Cloudflare and some don't. A server-wide firewall rule would break the ones that don't, a per-domain switch only affects the sites behind Cloudflare.
- You don't maintain the IP list by hand. OpenPanel builds it from Cloudflare's published ranges (
cloudflare.com/ips), andopencli domains-cloudflarerefreshes it. - The server can still reach its own sites. Its own IPs are allowed, so wp-cron, loopback requests and health checks keep working.
Server administrators can restrict domains for every user from OpenAdmin > Domains (the Cloudflare bulk action), or from the terminal:
opencli domains-cloudflare enable example.com          # one domain
opencli domains-cloudflare status --all                # which domains are restricted
opencli domains-cloudflare enable --all -y             # every current and new domain
Only restrict domains that are proxied through Cloudflare (orange cloud on). If the domain points straight at your server, every visitor gets the 403.
On Nginx
On a server you manage yourself, Nginx can do the same per server block. The common mistake is combining allow/deny with the real_ip module: once Nginx has replaced the address with the visitor's real IP from CF-Connecting-IP, allow 173.245.48.0/20 is compared against the visitor, and everyone gets blocked.
Check the connecting address instead, which real_ip keeps in $realip_remote_addr:
# http {} block: 1 when the TCP connection came from Cloudflare
geo $realip_remote_addr $from_cloudflare {
    default 0;
    173.245.48.0/20 1;
    103.21.244.0/22 1;
    # ...every range from https://www.cloudflare.com/ips-v4 and /ips-v6
}

# real visitor IP for logs and rate limits
set_real_ip_from 173.245.48.0/20;
# ...same ranges
real_ip_header CF-Connecting-IP;
# server {} block of a Cloudflare-proxied site
if ($from_cloudflare = 0) {
    return 403;
}
Cloudflare adds ranges from time to time, so regenerate the list from cloudflare.com/ips-v4 and ips-v6 on a schedule.
With a firewall (one site per server)
If every site on the server is behind Cloudflare, you can block direct traffic before it reaches the web server at all. With ufw:
for ip in $(curl -s https://www.cloudflare.com/ips-v4) $(curl -s https://www.cloudflare.com/ips-v6); do
  ufw allow proto tcp from "$ip" to any port 80,443
done
ufw deny 80/tcp
ufw deny 443/tcp
This is the strongest option, because the connection is dropped by the kernel. It's also all-or-nothing for the whole server, which is why hosting panels with many customers need the per-domain approach.
On cPanel
cPanel has no built-in way to make a domain accept only Cloudflare traffic. Cloudflare's own cPanel plugin was retired in 2022, when Cloudflare ended its hosting partner program, and the cloudflare.conf that cPanel adds to Apache only restores the visitor's IP in logs (mod_remoteip). It doesn't block direct connections.
On cPanel you're left with a server-wide firewall rule (CSF or iptables, with the all-or-nothing problem above), or .htaccess rules per site. Those run into the same trap as Nginx: once mod_remoteip has replaced the address, Require ip checks the visitor, not Cloudflare.
Step 4: Get the real visitor IP back
Behind Cloudflare, every connection to your server comes from a Cloudflare IP. Without telling your web server to trust Cloudflare's CF-Connecting-IP header, your access logs, statistics and rate limits all see a handful of Cloudflare addresses instead of your visitors. Rate limiting is the dangerous one: one busy Cloudflare edge can carry hundreds of real visitors, and a per-IP limit would block all of them at once.
In OpenPanel, the web server trusts CF-Connecting-IP, but only from Cloudflare's ranges (on new installations, and on updated servers once rate limiting is turned on), so the rate limits and logs count each real visitor. A visitor who sends a fake CF-Connecting-IP header straight to the server is ignored, because the header is only read on connections from Cloudflare.
On Nginx, the set_real_ip_from lines in Step 3 do the same. On Apache, configure mod_remoteip with RemoteIPHeader CF-Connecting-IP and a RemoteIPTrustedProxy line per Cloudflare range.
Step 5: If your IP was already leaked
A Cloudflare-only setup stops attackers from using the site directly. It doesn't make the IP secret again, and a flood aimed at the IP itself still has to be absorbed by your server or your provider's network before the web server can refuse it.
If the IP is in DNS history or was attacked before:
- Move to a new IP address that has never been in public DNS. Most VPS providers let you add one.
- Point only Cloudflare at the new IP, and keep mail and FTP on the old one or on another server.
- Turn on Cloudflare-only for every proxied domain before you publish the new IP to Cloudflare.
- Consider Authenticated Origin Pulls, where Cloudflare presents a client certificate that your server verifies, or Cloudflare Tunnel, which needs no open web ports at all.
Cloudflare-only isn't a replacement for limits on the server
Cloudflare-only makes sure attackers have to come through Cloudflare. It's still worth limiting what any single visitor, or any single site, can do on the server itself:
- Rate limits per IP and per domain, so one scraper or one viral page can't use all PHP workers. OpenPanel sets these per domain under Domains > Rate Limiting, and they count real visitor IPs behind Cloudflare.
- A web application firewall. OpenPanel runs CorazaWAF with the OWASP Core Rule Set per domain.
- Resource limits per account, so one overloaded site slows down only itself and not every other site on the server.
OpenPanel vs. cPanel: Cloudflare-only access
| OpenPanel | cPanel | |
|---|---|---|
| Restrict one domain to Cloudflare | Yes, one click in the domain's actions menu | No, needs manual .htaccess or firewall rules |
| Bulk restrict many domains | Yes, bulk action for users and admins | No |
| Cloudflare IP list | Built from Cloudflare's published ranges | Manual |
| Real visitor IP behind Cloudflare | Yes, trusted only from Cloudflare's ranges | Yes, mod_remoteip via cloudflare.conf |
| Server keeps access to its own sites (cron, loopback) | Yes | Depends on your rules |
| Command line | opencli domains-cloudflare | No |
| Cloudflare plugin | Not needed | Retired in 2022 |
If you're comparing control panels, see our cPanel alternative guide for the full feature comparison.
Checklist
# 1. which public records still point at the server?
dig +short A example.com mail.example.com webmail.example.com ftp.example.com
dig +short MX example.com

# 2. does the origin answer direct requests? (run from another machine)
curl -s -o /dev/null -w "%{http_code}\n" -H "Host: example.com" http://YOUR_SERVER_IP/
# 200 = exposed, 403 = Cloudflare-only is working

# 3. in OpenPanel: restrict the domain and check it
opencli domains-cloudflare enable example.com
opencli domains-cloudflare status example.com
- Every website record is proxied (orange cloud).
- Mail and FTP use a different IP than the websites, or a different server.
- The domain is restricted to Cloudflare, and a direct request returns
403. - Logs and rate limits see real visitor IPs, not Cloudflare's.
- If the IP was in public DNS before, move to a new one.